Tuesday, June 28, 2011

Hoot Hoot to You!!


Today's inspiration came from my June 2011 Stampin' Success Magazine.
It's a magazine SU! Demonstrators receive to 
INSPIRE us to CREATE so we can SHARE with others.

A fellow demonstrator Doris Denman's card just wowed me.
So I decided to take the plunge and try it out for myself.
So here is my take of a tri-fold shutter card.
I started with SU! Chocolate Chip as my base card stock 
and added DSP from a Paper Pack,
I had in my closet that I never used.
and decided this was the perfect opportunity.
Instead of covering all the sections with DSP, 
I choose to use Punches and Stamps
 I think it adds a lot of dimension and is a fun way 
to showcase a lot of different ways to decorate a card all in one place.

Tri-Fold Shutter Card's


Materials Used:

Paper: SU! Chocolate Chip, Whisper White, Very Vanilla,Tempting Turquoise & Melon Mambo and Non-SU! Birthday Extravaganza DSP

Punches: SU! Owl Builder, Decorative Label,Scallop Circle Punch,Photo Corner
Stamps: SU! Family Accessories,Afterthoughts(hostess),On your Birthday,
(SU! Retired Sets Birthday Balloons & Birthday Whimsy

Let Me Know What You Think,
Happy Stamping,
Kymberli 


Full Front Tri-Fold Shutter Card

Here is my Tutorial for a Full Front Tri-fold shutter card,


I hope this tutorial is helpful and inspires you to create something fabulous.
So without further ado...


First you will need your base card stock at 5 1/2" x 12"


Then you will score your card stock at  4",8" and 10"


I then fold on all my score lines

Then you measure 1 1/2" down from the top on the 12" side


Then cut from the 4"score line to the 10"score line,
rotate the paper and measure 1 1/2" down from the bottom and
cut again from the 4" score line to the 10" score line.
Fold Again and this is what your base card should look like 


Paper needed;

5 1/2" x12"   Card Stock Base
Coordinating Color Card Stock or Designer Series Paper in these sizes
if you choose to cover up each section.
1 piece cut at 3 3/4" x 5 1/4"
2  pieces cut at 1 3/8" x 3 3/4"
1 piece cut at 2 1/4" x 3 3/4"
2 pieces cut at 1 3/4" x 1 3/8"
1 pieces cut at 1 3/4" x 2 1/4"
1 pieces cut at 1 3/4"x 5 1/4"


Now you can decorate any way you like
your creativity is your only limitation. 

Happy Card Making,

Kymberli

Tri-Fold Shutter Card Tutorial

 
Here is my Tutorial for a Tri-fold shutter card,
I actually got the idea from my June 2011 Stampin' Success Magazine.
It's a magazine SU! Demonstrators receive to inspire us to create so we can share with others.
A fellow demonstrator Doris Denman's card just wowed me.
I had never seen one of these cards and after, I googled it, Boy did I feel like I was in the dark and oh the possibilities it is such a versatile card that can be used for any occasion.
I hope this tutorial is helpful and inspires you to create something fabulous.
So without further ado...


First you will need your base card stock at 5 1/2" x 12"


Then you will score your card stock at 2",4",8" and 10"


I then fold on all my score lines

Then you measure 1 1/2" down from the top on the 12" side


Then cut from the 2"score line to the 10"score line,
rotate the paper and measure 1 1/2" down from the bottom and
cut again from the 2" score line to the 10" score line.

Fold Again and this is what your base card should look like 


Paper needed;

5 1/2" x12"   Card Stock Base
Coordinating Color Card Stock or Designer Series Paper in these sizes
if you choose to cover up each section.
2 pieces cut at 1 3/4"x 5 1/4" for outside sections
4 pieces cut at 1 3/4" x 1 3/8"
2 pieces cut at 1 3/4" x 2 1/4"
this will cover the 6 sections moving inwards.
for the last middle/sentiment section
2 pieces cut at 1 3/8" x 3 3/4"
1 piece cut at 2 1/4" x 3 3/4"

* Just a side note if you are using two different papers to decorate,
if you place the same paper facing in only one direction, your card will look one way when looking from the right and display the other paper from the left.
Hope I haven't confused you yet?

Now you can decorate any way you like
your creativity is your only limitation. 

Happy Card Making,

Kymberli

Sunday, June 26, 2011

Buckle Card Tutorial

I was asked for a tutorial on the buckle card, 
I posted a few days ago so, I thought what the heck,
I did not create this card from scratch, I got the idea from SCS about 4 years ago.   
Here is my version and I hope you can understand it 
and I hope it inspires you to create one of your own.
                                                                                                                                                                                                                                    
First you need 3 pieces of paper of coordinating colors
Card Base                  5 1/2 in. x 8 1/2 in
Belt                               1 5/8 in. x 4 in.
Inside Card Piece       4 in. x 5 1/4 in.  
&  SU! Word Window Punch (119857)


Then you will need to score the card base at 4 1/4 in. and fold in half,
then score the belt piece at 1 in. and fold over, you will use this piece to attach the belt to the card.


At this point you would emboss the belt piece if you would like it to look like mine,
  I used SU! Flower Garden Embossing folder with the Big Shot.
You can also use a corner rounder on the 3" portion of the belt that you are able to see and use to close the card.

Then place the word window punch as far as it will go

 Now you can decorate the front flap & add whatever border you want.
I used the scallop edge border punch on the front flap of the card.
If you choose not to use a border and the belt isn't sitting flat,
you can take your cutter and remove a sliver or up to 1/2'' to have your 
inside card piece show. I myself sometimes like to write novels in my cards 
and don't like my writing to show so keep that in mind the more you cut the less covered 
space you will have for a sentiment.


I add snail to the 1'' scored portion on the right side of the paper


I then fold the card over and place the belt in the buckle(word window punch slot).
and align the 1'' section to the inside of the card,
so it will close up nicely and everything is straight.


and press it down so it is secure,


at this point you will want to decorate the inside card piece before you place it inside


You can now place the inside card piece to cover the 1 in. belt piece and add whatever embellishment's and sentiments you like.

I made my own DSP with the Fabulous Florets Stamp Set and used that as my top accent piece, I then added a piece of pumpkin pie ribbon and and then attached it to the front of the card.
I then cut out the two flower images with my SU! paper snips and added some color to the flowers with SU! sponge daubers,then added a stampin' dimensional and the front of the card was finished.


 Voila !
My second Tutorial Done and I hope it inspires you to Create something Fabulous!


Friday, June 24, 2011

Designer Series Paper ... Well Almost Tutorial

So for those of you that are following me and my crafting antics,
You know I am trying to use what I have before going out and buying more.
I thought, I would show you a fun way to make your own Designer Series Paper (DSP)

I did not come up with this and have been using this idea for over 5 years. and for some of you, 
you will see it and think been there done that but sometimes it's fun to bring back something old.


You need 3 items to get you started:

A Favorite Stamp Set
3 Ink Pads 
A Piece of Card Stock 8 1/2 x 11 or 12x12


For this tutorial, I am using SU! fabulous Florets Stamp Set
Daffodil Delight, Melon Mambo & Tangerine Tango Ink Pads
& I am using SU! Whisper White Paper. 
In my opinion to date I have found no comparison to SU! Whisper White Paper.
 Your stamped image comes out crisp and the ink color's come out very rich.


So to begin I used daffodil delight on my first image, I like to begin with the darkest 
or in this case the boldest stamp first,
because you can always add but you cant take away.
I also make sure to turn my stamp so my images are facing in every direction.
So when you go to cut your paper to add to your projects.
It wont matter how you cut the sheet up because in any direction there will always be an image facing
right-side up.


I then used Melon Mambo with my second image.
filling in the spaces and remembering to turn my stamp.


I then used my 3rd image in Tangerine Tango,
at this point it is a matter of preference.
You can keep stamping so that very little of your base card stock is showing or leave a little more space and when you cut the sheet up to use you can always add a stamp here or there to fill it in.

I choose to go back over my sheet with my last image in daffodil delight.


Voila! your done.

Here is how, I used my DSP
 &
A couple more samples of custom DSP.

Your choices are endless, you could heat emboss a whole sheet or just some images
you could add glitter.
The only restriction is your imagination.
You can now use your custom "DSP" to add your unique twist to your creations.

I hope this tutorial inspires you to create something new and use something you already own.
I would love to see what you come up with.


Happy Birthday Rafi


This is a card holder,  I made for a dear family friend, I used SU! Basic Black card stock and found the tutorial on SCS here is a link to the Stationary Box Directions
I didn't add the address book,stamp pocket or pen.
Here are a couple more pics of the box.

I made 4 full size cards,
3 3x3 cards and envelope's and 4 tags.


I did emboss the paper with the big shot before making mini envelopes and I stamped a small sentiment on the back of the tags that could be used for any kind of gift.

Let me Know what you think.

Paper FlowerTutorial Update

I have had such a wonderful response from my first tutorial and I am so happy that there are people out there that are enjoying it and I hope it is inspiring you to create some wonderful projects.
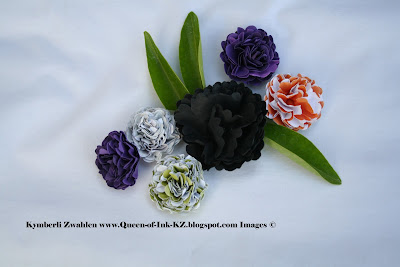
I just wanted to add a picture so you could see the difference between SU! card stock and regular 
scrapbook paper.


The purple flowers are SU! paper and only 8 scallop circles were used.
The black flower was made with 8 half scallop circles,I had them left over from a project,
I made with the Big Shot petal cone die. I just overlapped them a bit before placing a brad in them. I thought it was a good use of my scraps. I think it would look nicer a bit fuller so next time, 
I would probably use around 12.
The last three were made with reg. scrapbook paper, They were colored on one side and white on the other, As I stacked them I alternated between the colored and white side to give them a different look.
They are not SU! so the paper was very thin.
I used 10 on the orange one,14 on the green & 16 on the whiter one.
I hope you can tell by the pictures the fullness.
Also Danie Stamps from Texas was so nice to add a link on her blog to my tutorial and she added a great idea some of you might like to try, She used body spray instead of misting with water so her flowers had a nice scent to them.
I haven't tried it yet,but it's on my to do list. Hope all this helps
and I would love to hear back from you or see what you've come up with.

Thursday, June 23, 2011

DOstamping Stars Thursday Challenge #54


So for this week's challenge when,I saw these colors all that came to mind was the
Fabulous Florets Stamp Set it is so versatile.
I love that it has a coordinating embossing folder 
for the "Big Shot"and the "DSP" .
I started off with Tangerine Tango as my Base Card and I Stamped on Whisper White alternating the flowers to make my Custom "DSP" so the colors could match this weeks challenge.
I embossed the buckle with the coordinating Flower garden Embossing Folder.
I then stamped two more images of the flowers and used sponge daubers to add some color, I cut them out and used Stampin' Dimensionals to "pop" them out and I think it adds another dimension to the card. 
Every time, I see this set it just makes me smile.
I hope you like my Buckle Card this week.


Materials Used:
SU! Stamp Set: Fabulous Florets
 SU! Paper: Daffodil Delight,Melon Mambo,
Tangerine Tango and Whisper White 
SU! Ribbon:Pumpkin Pie
 
Let me Know what you think
Happy Stamping,
Kymberli
Related Posts Plugin for WordPress, Blogger...